
The holidays mean lots of family, friends, and food. Mountains of food. This easy two-tool charcuterie board is a simple, beautiful, way to spice up the presentation of your spread.
We’ve been invited to a few holiday parties this season and are planning on “gifting” a board to the host, complete with a spread of meats and cheeses for the party. To me, there’s nothing better than a handmade gift that comes with a snack!

You don’t need a woodshop to get this done either- all you’ll need is a jigsaw, drill, hammer, and some sandpaper. A counter-sink bit (a drill bit that bores out your hardware hole and also creates a countersunk crevice that allows the bolt head to sit flush with your board) and palm sander help, but are not at all necessary. This project is great for a weekend DIY or someone who wants to make handmade gifts for coworkers, family, and friends.
I recommend using a hardwood for this project like walnut or maple so it doesn’t get dinged up during use- I used maple. You’ll also need a piece of cardboard, two nails, a piece of string, some wipe-on poly, and rad handle hardware.
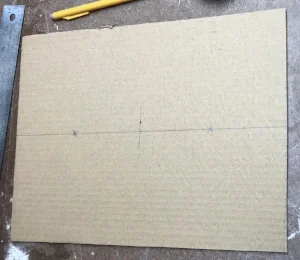
To start your project, make a template using cardboard. Cut the cardboard down to the width of your material and whatever length you want the final project to be. Remember that you will lose a few inches of snack space to the handles, I’d recommend making it slightly oversized. My board is 9” wide and 17” long.

Once your cardboard is cut to size, find the middle point and draw a line lengthwise down the center of your template. Then, divide this line into thirds and make two marks to designate each third. This step is important as it helps create a “jig” that allows us to mark out a perfect oval for our board edges. The marks you make along this centerline are where you’ll hammer nails to guide your string.
Once your holes are marked and your nails are set tie a string around the nails using the edge of your template to determine the diameter of the string. Using a pencil, mark a line around your template guided by the tension of the string as it rotates around the nails.

One caveat though; this nail-and-string trick helps you create a perfect curve for the ends of your boards that will exactly fit the material you’re working with. It’s not necessary, though. You could also draw a general curved shape on your template and use that to mark out your cut lines. You could also just make a rectangular charcuterie board! I prefer the string method because it ensures that both sides of the board are exactly the same and perfectly proportioned to the size of the material I’m using and I love the way the curve looks.
Once your oval is drawn, cut your template in half and along the edge curves on either side. Use these curves to mark out your perfectly matched edges on either end of your workpiece.

With your curved lines marked out, take your jigsaw out and go to work cutting along the curved edges, keeping as close to the line as possible. It goes without saying, but be careful. Sharp things are sharp. Make sure your workpiece is secured to a solid surface and keep your hands and fingers away from the blade.
Once your curves are cut it’s time to find the perfect spot for your handle hardware. This step will change depending on the hardware you choose, but I love these perfect “t” brass cabinet knobs. They’re simple, modern, and functional.
To line up these holes measure half of the distance between each side of your board and make a mark. Then, measure 1 ½” in from the edge of your curve and line this measurement up with the centerpoint you just marked.
The intersection of these marks is your drill hole. Using your drill and a bit slightly larger than the screw that comes with your hardware (I used a countersink bit) drill all the way through your workpiece. If you don’t own a countersink bit but still want your hardware to sit below the bottom surface of your board take a drill bit that’s slightly larger than the head of your screw and drill partially into the hole you just made with the smaller bit.


Now all that’s left is to sand your workpiece up to 220 grit, cleaning up edges and correcting any jagged spots left by the jigsaw, and applying a few coats of finish using the directions on the container. Pro tip: Once the finish is dry, buff the board using a piece of a brown paper bag to get a silky-smooth finish and attach your hardware.


I love the look of these boards. They are so beautiful and simple. There’s an infinite number of combinations of wood species, handles, and edge shapes you could make to personalize each board. If you make this project tag me on instagram at @beardogdesigns and show me the final product!
